Friday 9 January 2015

Chocolate Chip Oatmeal Cookies

Sooooo Chewy!


Last week I had my final day working at Brandix, the company I had spent the last one and a half years at and I wanted to do something special for my colleagues. So as a last hurrah I made little gift packs for my team mates of some homemade Chocolate Chip Oatmeal Cookies.

I baked almost 150 cookies in whole and it took a lot of time, but it was soooo worth the effort because they were YUM. I even had to fend of the home-folks to ensure I had enough cookies to take to my office. This is what my dad to say about it all:
 

The most wonderful thing about these cookies are how easy they are to make.

Here's all you need to know:

Ingredients (for about 42 servings) :

225 g butter, softened
1 cup light brown sugar
1/2 cup white sugar
2 eggs
2 tsp vanilla extract
1 1/4 cups all-purpose flour
1/2 tsp baking soda
1 tsp salt
3 cups quick-cooking oats
1 cup chocolate chips

Instructions:

1. Pre heat your oven to 165C / 325F

2. In a large bowl, cream together the butter, brown sugar and white sugar. I did mine in a standing mixer and I mixed them for at least 6 minutes.

3. Add in the eggs, one at a time and stir in the vanilla. (Do not get mixed up with vanilla extract and essence. If you are using essence, you require a much smaller quantity) I allowed the mixture to beat for another 5 minutes. I've found the more time you spend creaming the mixture, you get a much better texture in the cookie.

4. In a seperate bowl, combine the flour, baking soda and salt. Stir this into the creamed mixtue but ensure not to overmix.

5. Finally mix in the oats and chocolate chips. Since I did not have ready-made chocolate chips, I chopped up some chocolate into very small pieces. You could also add some walnuts to add some cruch to your cookies.


6. Line your baking trays with baking paper and drop heapfuls of cookie dough. I was able to get 12 dollops of dough on each tray.

7. Bake for 12-15 minutes in the pre-heated oven.  Do not overbake the cookies as they continue to bake once taken out of the oven.

8. Allow cookies to cool for about 5 minutes before transferring them to a wire rack to cool completely.


Well, what can I say... they were soooo good. They were the right amount of sweetness, intensely chewy and always kept you wanting another one. I was surprised how good they would turn out but you can't get a cookie simpler than that.
 

You have got to try it out!

Love,

Monday 22 September 2014

Strawberry Cream Cake


It’s BIRTHDAY season! September is a busy month for my family. We have SIX birthdays between Juho’s and my family and it is busybusybusy. This weekend we had family over for some cake and small bites and I was quite excited for the chance to bake again.

As you can observe, it’s been awhile since my last post. Cough cough. But I have been inspired to start baking again and what better occasion to start than a birthday party!

I am in love with Strawberry Cream Cakes. It was love at first bite and I have my husband to thank for that. The first strawberry cream cake I ate was baked by my mother-in-law and it was out of this world. I loved it so much but I had never attempted to make one myself. So this weekend I decided to make my very first Strawberry Cream Cake.
 

I was quite nervous because I hadn’t baked in such a looooong time but I was so pleased at how it turned out. It was incredibly moist, the perfect amount of sweet and I was getting nervous because the cake seemed to be disappearing too fast! It is also the simplest thing to make, I don’t know why I had never made one before.


So this is what you will need:

Ingredients:

For the Cake:

3 Cups Granulated Sugar
340g Butter, softened
6 Eggs
6 tsp Vanilla Extract
6 tsp Baking Powder
3/8 tsp Salt
4 Cups All Purpose Flour
1 Cup Butter Milk (1 cup milk + 1 tsp vinegar = 1 cup buttermilk)
1 large tin of peach halves
Strawberry jam
Strawberries
500 ml of Whipping Cream


Instructions:

For the Cake:

  1.  Preheat oven to 350 F / 175 C / Gas Mark 4. Butter your cake pan (13x9”) 
  2. Cream together the sugar and butter with an electric mixture, for about 5 minutes.
  3. Add the eggs and vanilla and cream together for another 5 minutes, until you get a smooth mixture.
  4. With the speed on slow, add the dry ingredients (baking powder, salt, flour) and slowly add the milk and mix everything to combine. Do not overmix!
  5. Pour the batter into the pan and smooth evenly.
  6. Bake for 30-35 minutes and let cool for about 30 minutes before coating with topping.
  7. Repeat the above procedure to get two rectangular slabs of cake.


For the Filling/Topping:
  1. Slice the peach halves into thin slices.
  2. Hull the strawberries, wash well and slice in half.
  3. Warm the strawberry jam for a few seconds in the microwave to get a slightly runny consistency.
  4. Whip the cream with a little sugar.

Cake Assembly:

  1. Moisten the foundation layer of the cake by sprinkling it with a sugar-water mixture.
  2. Apply the strawberry jam on the bottom layer of the cake.
  3. Cover with peach slices and gently place the next layer of the cake.
  4. Once again, moisten the cake layer.
  5. Cover the cake with whipped cream and decorate with strawberries as you please.

 
It was a lovely evening with family and a wonderful way to start a brand new year of life! I've also been inspired to bake again so hopefully you will be seeing more recipes in the near future *wink wink*

Have a lovely week ya'll!

Monday 4 February 2013

Vanilla Sponge Cake With Crumble Topping

Today is Sri Lanka's Independance day so...

HAPPY INDEPENDANCE DAY, my beautiful Sri Lanka!

And with that being said, I've been baking! Two of my childhood school friends were coming over for a slumber party. Yes, I am a grown, married woman who has slumber parties and they are awesomeee. Nothing like catching up with friends you have grown up with and laughing 'till your stomach hurts.

So they deserved some good ol' baking love and I decided to make a Vanilla Sponge Cake with Crumble Topping.


I got this recipe for Sponge cake awhile back and it has never failed me. It is soooo soft and spongy and light! And amongst the 3 girls we gobbled down the whole cake overnight. *burp*

So here is the recipe:

Ingredients:

For the Cake:

1 Cup Granulated Sugar
113g Butter, softened
2 Eggs
2 tsp Vanilla Extract
2 tsp Baking Powder
1/8 tsp Salt
1 1/3 Cups All Purpose Flour
1/3 Cup Butter Milk (1 cup milk + 1 tsp vinegar = 1 cup buttermilk)


For the Crumble Topping:

1/3 cup Brown Sugar
1 tbs All Purpose Flour
1 tbs Butter
A pinch of Ground Cinnamon


Instructions:

For the Cake:

 1. Preheat oven to 350 F / 175 C. Butter your cake pan (9")

2. Cream together the sugar and butter with an electric mixture, for about 4 minutes.

3. Add the eggs and vanilla and cream together for another 4 minutes, until you get a smooth mixture.

4. With the speed on slow, add the dry ingredients (baking powder, salt, flour) and slowly add the milk and mix everything to combine. Do not overmix!

5. Pour the batter into the pan and smooth evenly

6. Bake for 30-35 minutes and let cool for about 30 minutes before coating with topping.

For the Crumble Topping: 

1. In a small mixing bowl, combine the brown sugar, flour and cinnamon

2. Cut in the butter and mix until you get a crumbly texture.


3. Sprinkle over the cake 


And voila! So simple, so easy and SO YUMMY.

Go and try it nowwww! And have a good night ya'll!

Love,
K

Monday 21 January 2013

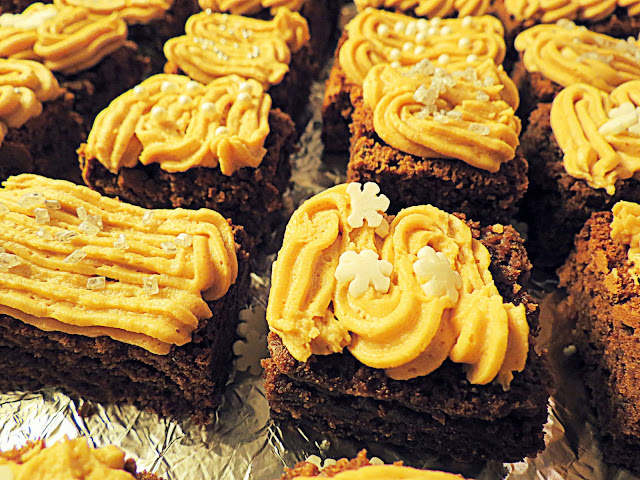
Peanut Butter Frosted Cake Brownies

Good Morning Peeps!

I had a free few minutes at work and I thought 'Hey! Why not post a recipe as you have not posted once in the last few hundred years? Now how about that!'

And I went back to my folder of 'Recipes to Post'. Yes, I have such a thing and it is full to the brim. Clearly goes to show how often I post things. I am such a terrible blogger. But according to my 'Goals For January' I'm much more motivated to have new posts coming in through the month!

So this one is for all you Peanut Butter lovers. I am particularly against Peanut Butter. I used to love it when I was younger but for some reason over the last two years I have started feeling very nauseous for the smell of peanut butter. And so I have great hesitations using it for baking because most of the time I can never truly enjoy it. But it was our Youth Christmas Party in Finland and I felt like I needed to make something different. And thus, the Peanut Frosted Cake Brownies. And irregardless of my distaste for Peanut Butter...these turned out great!


Ingredients

For the Cake Brownie:

¼ cup of Unsalted Butter, softened at room temperature
100 g of Chocolate, melted either in a microwave or over a double boiler
¾ cups of Sugar

1 Tbs sour cream
2 Eggs
2 Tsp of Vanilla Extract
1 Tsp of Instant Coffee Powder
3 Tbsp of Whole Milk, lukewarm
1/2 cup of All Purpose Flour
½ tsp of Baking Powder
¼ tsp of Salt


For the Peanut Butter Frosting:

113g butter, softened
1 cup creamy peanut butter
1 cup confectioner's sugar
3 Tbsp milk (or as needed)

 Instructions

For the Cake Brownie:

1. Preheat your oven to 175C/ 350F, lay the bottom of an 8x8 inch baking dish with parchment paper and set aside. 

 2. In a small bowl, mix together the flour, instant cofee powder, salt and baking powder and set aside.

3. In a large bowl, beat together the butter, sugar and sour cream.


4. Add the eggs, vanilla and milk and mix together well.

5. Add the melted chocolate and beat until the mixture is thick and creamy.
 

6. Add the dry ingredients and mix them in until they are well blended.
 

7. Pour the batter into the prepared pan and bake it for 30 minutes.

8. Cool completely before cutting.  


For the Peanut Butter Frosting:

1. Place the butter and peanut butter into a medium bowl, and beat with an electric mixer. 

2. Gradually mix in the sugar, and when it starts to get thick, incorporate milk one tablespoon at a time until all of the sugar is mixed in and the frosting is thick and spreadable. 

3. Beat for at least 3 minutes for it to get good and fluffy.

And then you can frost it however you please! I decided to add a little wintery decor to match the snowstorm outside. Also, it's worth mentioning that these brownies are super nice because they are sort of cakey and sort of brownie - for those that like a little bit of everything ;)


Hope you have fun trying these out, because I tell you, from someone who does not like Peanut Butter...I LOVED these!

Have a blessed day,
K

Saturday 15 December 2012

Vanilla Cupcakes with Cream Cheese Frosting

I will not even comment on how long it has been since our last post. I refuse to think about it. The guilt is too much for me. Gah.

But on a happier note, here we are with cutsie post. I would like to call this the 'Finnish Flag Cupcake' Very original and creative, I know. But it is what it is.


 So it was the Finnish Independance Day on the 6th of December. Hurrah for Finland! And I was in the mood to make something blue and white and YUMMY. So without any delay here is the recipe...

Ingredients:

For the Cupcakes:

1 Cup Granulated Sugar
113g Butter, softened
2 Eggs
2 tsp Vanilla Extract
2 tsp Baking Powder
1/8 tsp Salt
1 1/3 Cups All Purpose Flour
1/3 Cup Butter Milk (1 cup milk + 1 tsp vinegar = 1 cup buttermilk)


For the Cream Cheese Frosting:

400g cream cheese, softened
113g butter, softened
2 ½ cups powdered suger
1 tsp vanilla 
Pinch of salt  

Instructions:

For the Cupcakes:

1. Preheat oven to 350 F / 175 C. Line your cupcake tin with liners and set aside.

2. Cream together the sugar and butter with an electric mixture, for about 4 minutes.


3. Add the eggs and vanilla and cream together for another 4 minutes, until you get a smooth mixture.

4. With the speed on slow, add the dry ingredients (baking powder, salt, flour) and slowly add the milk and mix everything to combine. Do not overmix!

5. Scoop the batter into your lined cupcake tin, make sure its only filled ¾ of the way up because they will rise.

6. Bake for 20 minutes and let cool for about 45 minutes before frosting.

For the Frosting:

1. In a bowl, beat the cream cheese and butter with an electric mixer until smooth, about 1 minute. 
2. Add sugar, vanilla, and salt. Blend on low speed for 30 seconds and then beat until fluffy.


Ok these cupcakes may not depict the true nature of that flag -_- but they were yummy! And in the end that's what matters! The cupcakes were moist and delicious and I'm always a strong lover of cream cheese so they were perfecto!

Try and enjoy!

Love,
K

Tuesday 2 October 2012

Cafe Regatta

Oh it's a glorious night tonight. Here I am in bed with 'Some Nights' by Fun repeating in the background. Tucked in bed with a warm cup of tea. Cuddling with my husband and my puppy and typing THIS. And all of that before 10pm. It's a dream, I tell you.

Today it was Juho's and mine date evening and he took me to this beautiful little cafe by the sea called The Regatta.


It's a quirky little cafe with the most interesting signs and in my opinion, quite a unique little system. We sat outside on the terrace and luckily for us the sun was out in all it's glory! It's pretty cold and windy though considering it's Autumn but that didn't stop us from enjoying the beautiful scenary and enjoying our little cinnamon buns and tea and coffee.

The view from our table
"This is a boat"

Cinnamon Bun
The bird houses
In this place, they pay YOU 5cents to have another cup of coffee! I mean, come on...it doesn't get better than that! And the place is filled with weird and hilarious little signs and decor - there is no boring corner in this cafe!

"This an announcement! If you want more coffee you won't pay anything for it, but we will pay you 5cents for a cup"

This toilet is occupied ;)

The decor for the bathroom mirror

All in all, it's a lovely little cafe to spend your evening, especially if it's good weather. So go ahead and check it out! You won't be disappointed :)


Goodnight!


Sunday 30 September 2012

Espresso White Chocolate Chip Brownie Cookies

A Cookie A Day, Keeps The Blues Away!

Well, what a lovely Monday morning it is!

I know most people don't like Mondays but mine is not so bad considering I'm having one of these!


Espress White Chocolate Chip Brownie Cookies. I mean just the name should tell you how yummy these cookies are. It has espresso, white chocolate and chocolate brownies all mixed in one bite-size little cookie. I made these as a snack for a meeting we will have tonight and I had to work hard to protect them from Juho! ;)


So so let's get started shall we?

Ingredients:

150g dark chocolate
100g white chocolate (1 cup white chocolate chips)
113g butter
3 eggs
1 cup + 2 tbs sugar
2 tsp instant coffee granules
3/4 cup all-purpose flour
1/3 tsp baking powder
1/4 tsp salt

Instructions:

1. Pre heat your oven to 175C / 350F

2. If you have white chocolate chips, that's great! But if not, you can do what I did, which is chop up the white chocolate into small pieces, coat with a bit of flour and set aside.


3. Using a double boiler, melt the dark chocolate and the butter until you have a smooth mixture and set aside to cool.


4. In a large bowl, beat together the eggs, sugar and coffee granules. Beat for about 3 minutes until the mixture is very thick and forms a ribbon when the whisk is lifted.


5. Add the cooled chocolate mixture slowly to the egg mixture while whisking well (so as not to let the eggs curdle in case the chocolate mixture is too warm!) Mix well until all is combined.


6. Sift in the flour, baking powder and salt into the mixture and mix until combined. Add the white chocolate chips and stir.


7. This mixture can be a bit runny so it is advisable to pop it into the fridge for about 15-20 minutes before baking.

8. Using a tablespoon or an ice-cream scoop, heap little portions onto a baking sheet about 2 inches apart.

9. Bake for 10-12 minutes (it is better that they are underbaked rather than overbaked, as they will harden on their own while cooling)

Extra notes!

- They are very sticky so make sure they cool for awhile before trying to remove them from the baking sheet as the bottom may come off, so use 2 seperate baking sheets and cycle them.

- Inbetween the batches, it is best to put the batter in the fridge in case it gets too runny.

...and that's all folks! I just have to say they were yummy yummy yummy. And SO CHEWYYYY! Gah I love chewy cookies :D


Try making them today! And have a blessed day!

Love,
Keshi

Monday 24 September 2012

Cheese Buns

Heaven in a Cheese Bun

One of Juho's complaints is that I make a lot of sweets and not enough savoury things SO I decided to make some Cheese Buns. I've never made them before and to be honest I really don't like making bread and buns  and stuff like that. But I thought hey, I'll give it a try and believe me when I tell you, these buns...they were amazing. Right now the house smells like heaven and it feels like cheesy ecstacy in my mouth. Mmmmm. Yes, I just gobbled one down. So let me give you the recipe so you can try it out and enjoy it as much I am right now!


Ingredients:

1 cup milk
75g of butter, melted
1 packet (11g) dry yeast
4 cups of all-purpose flour
1/3 cup of sugar
1 tsp salt
3 egg yolks
1 cup of grated cheese

Instructions:

1. In a small saucepan, warm the milk. Take it off the heat and pour into a large mixing bowl.
2. Add the melted butter and mix well.
3. In a seperate bowl, add and combine the flour, dry yeast, sugar and salt
4. Add the dry ingredients to the butter and milk. Add the egg yolks and mix well until you have a smooth dough
5. On a lightly floured surface, roll the dough into a ball. Place the ball into a lightly oiled bowl, brush the top of the ball with oil and cover with a cloth and leave in a damp place for about an hour until it has doubled in size.
6. Take the dough and divide it into 12 equal pieces. With each piece, form into a ball and make a hole in the centre and fill it with the grated cheese. Once filled, pinch the dough so that it covers the whole and forms a whole ball again.
7. Line all your 12 buns on a parchment paper and cover with a cloth and leave to rise again for about 40min.
8. Preheat your oven to 190C / 375F.
9. Once they have risen, bake for 25-30min.

And it's that easy! Ah you have to try it out! and that's that ;)

*runs to grab another one*


Love,
Keshi

Monday 17 September 2012

Chocolate Fudge

Choco-late Fud-ge + Girl's Movie Night!

Groan. My throat hurts :(

Therefore to make myself feel better, I will think of happier times like last night for example. Girl's Solu!! Or for those of you who don't speak Finnish, Girl's Connect Group. Ah we had such a good time last night! Such a bunch of amazing young women, I have to say! :)


We had dinner, dessert and a movie. I'll come to the dinner and the movie in abit but let's focus on dessert for awhile, shall we? ;)

So one of the girls who come for the Solu can't eat much wheat so I was thinking what can I make for dessert which doesn't have any wheat at all and...voila! Chocolate Fudge! I've been dying to do a post on Chocolate Fudge for a looong time but somehow it kept getting forgotten. Poor Chocolate Fudge :( So FINALLY here it is!


Ingredients:

397g can of Condensed Milk
400g of Chocolate, chopped
Cashew Nuts
Marshmellows


Instructions:

1. In a large saucepan, melt the chocolate in the condensed milk and stir well until you have a smooth texture

2. Add in the marshmellows and cashew nuts and mix until they are all coated.


3. In a 9" by 13" pan, which is lined with baking paper (to ensure easy removal of the fudge) pour in the chocolate mixture and spread it out evenly.


4. Pop into the fridge and allow it to chill for about 12 hours.

Ok so it's super easy to make right? And yummy! So moving on...

For dinner we had super duper subs with bread that smelt amazinggg!

So this is what we stuffed in our subs

 
- Garlic Cheese Spread
- Feta Cheese
- Tomatos
- Cucumber slices
- Salad
- Spinach 
- Onion
- Honey Chicken
- Ham
- BBQ Sauce
- Mango salad dressing
- Mayo

And...

- GRAPES! Yes, thanks to Vilhelmiina we all ate grapes in our subs and it was SO GOOD!


And we watched What A Girl Wants, while gobbling down two bowls of the amazing left over Caramal Popcorn which Juho made! The movie was absolutely cheesy, had a great soundtrack and left us feeling good...so what else would you want?? :D

So that was our lovely evening and we look forward to many more like these!

Have a blessed day everyone!

Love,
Keshi